原文 In-depth analysis of ViewChild, ElementRef and ViewChildren in Angular
Angular @ViewChild 是一个最简单但同时也是最难的装饰器。你可以在做编码的时候学习它。@ViewChild是最常用的装饰器之一。该装饰器提供了大量的功能。在本文中,我们将深入研究@ViewChild、ElementRef、ViewChildren装饰器。我们将看到如何使用它的例子,并讨论实际应用中的问题。
什么是@ViewChild装饰器 @ViewChild是一个属性装饰器。它提供了一个强大的方式来访问子元素和属性。当我们想要访问父组件中的子组件元素、表单属性脏检查、触发事件,以及父组件中的指令时,@ViewChild是一种非常简单的访问方式。@ViewChild是一种非常简单的访问子元素的方法。
@ViewChild元数据
@ViewChild装饰器和ngAfterViewInit 当父组件开始渲染时,ViewChild装饰器不可用。它将不会在ngOnInit()生命周期钩子中可用。它将在ngAfterViewInit生命周期钩子中可用。
1 2 3 4 5 6 7 8 9 10 11 12 13 14 15 16 17 18 19 <div #parent > <div #divelement1 > Visible elements </div > <ng-container *ngIf =”show” > <p #divelement2 > Hidden element 1 </p > </ng-container > <ng-container *ngIf =”show” > <h5 #divelement3 > Hidden element 2 </h5 > </ng-container > </div >
这里我们有三个子元素作为ViewChild元素,它在父组件中可以ngAfterViewInit。注意,对于Angular 8以上版本来说,你必须确保设置,{ static: false },这是其他Angular版本的默认设置。
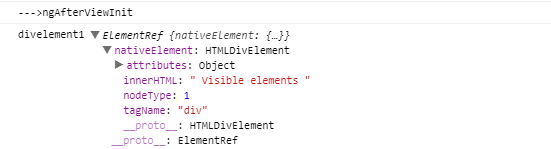
1
2
3
4
5
6
@ViewChild ("divelement1" , { static : false });ngAfterViewInit (console .log ('--->ngAfterViewInit' );console .log ('divelement1' , this .divelement1 );}
在页面渲染后,你可以看到元素细节在组件中被初始化。
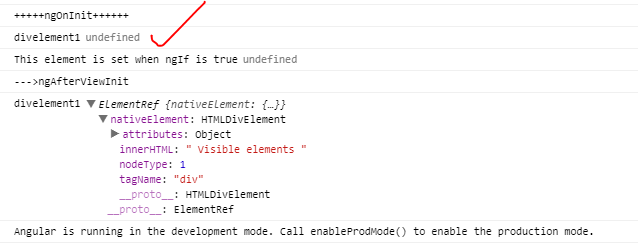
如果我们要访问ngOnInit生命周期钩子上的第一个开发元素。它将以未定义的形式出现。
1
2
3
4
ngOnInit (console .log (‘+++++ngOnInit++++++’);console .log (‘divelement1’, this .divelement1 );}
如何用*ngIf指令使用@ViewChild。ElementRef *ngIf是@ViewChild的一个重要指令。如果组合使用时,很有可能会错过父组件中@ViewChild的值。下面是使用@ViewChild和*ngIf的最优雅的方法。在父组件的HTML中使用以下代码行。现在我们在父组件中定义divelement2为@ViewChild。我们在这里使用ng-container只在我们想显示子组件的时候才显示,即在演示中,我们想在点击显示子组件按钮时显示子组件。
1 2 3 4 5 <ng-container *ngIf ="show" > <p #divelement2 > Hidden element 1 </p > </ng-container >
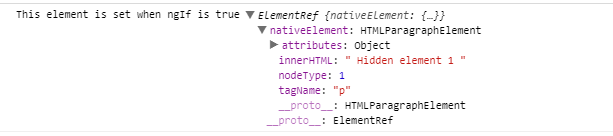
在父组件中,我们使用divelement2作为ElementRef。现在写一个setter方法,当子元素可见时将设置ele2。如果子元素不可见,就不会设置this.divelement2。一旦按钮显示子组件被点击,你可以在控制台中看到这个值。
1
2
3
4
5
@ViewChild ('divelement2' )set ele2 (v: ElementRef ) {console .log ('This element is set when ngIf is true' , v);this .divelement2 = v;}
现在点击显示隐藏子按钮。我们可以看到元素现在已经设置好了。
@ViewChildren的迭代器与@ViewChild的对比 @ViewChild提供了对子元素的控制,但是@ViewChildren提供了更多对元素的控制。@ViewChildren提供了一个引用列表,而@ViewChild只是一个单一的引用。@ViewChildren提供了一个对多个元素的引用,可以作为一个迭代列表使用。
1
2
3
4
5
<ng-container> <h5 #divelement3 > Hidden element 2 </h5 > </ng-container>
在parent中,组件将parent定义为QueryList<ElementRef>。在ngAfterViewInit中订阅子元素的变化。下面是完整的代码片段。所以在这里你可以得到所有子元素的元素以及每个元素的所有属性,如元素类型输入控件等。@ViewChildren的功能非常强大,你甚至可以得到DOM元素的 align 属性。在这里,我们可以订阅子元素的任何变化。
1
2
3
4
5
6
7
8
9
10
@ViewChildren (‘parent’) children : QueryList <ElementRef >;ngAfterViewInit ( this .children .changes .subscribe ((comps: QueryList<ElementRef> ) => { console .log (‘====>ngAfterViewInit.changes ’); console .log (‘divelement1’, this .divelement1 ); console .log (‘divelement2’, this .divelement2 ); console .log (‘divelement3’, this .divelement3 ); }); }
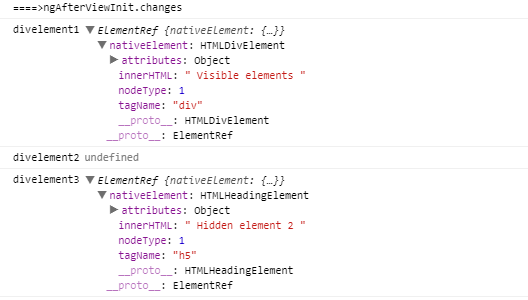
一旦你点击显示隐藏的子按钮,显示属性为真,这意味着有子组件的变化,所以订阅者会得到通知。现在订阅者日志如下。
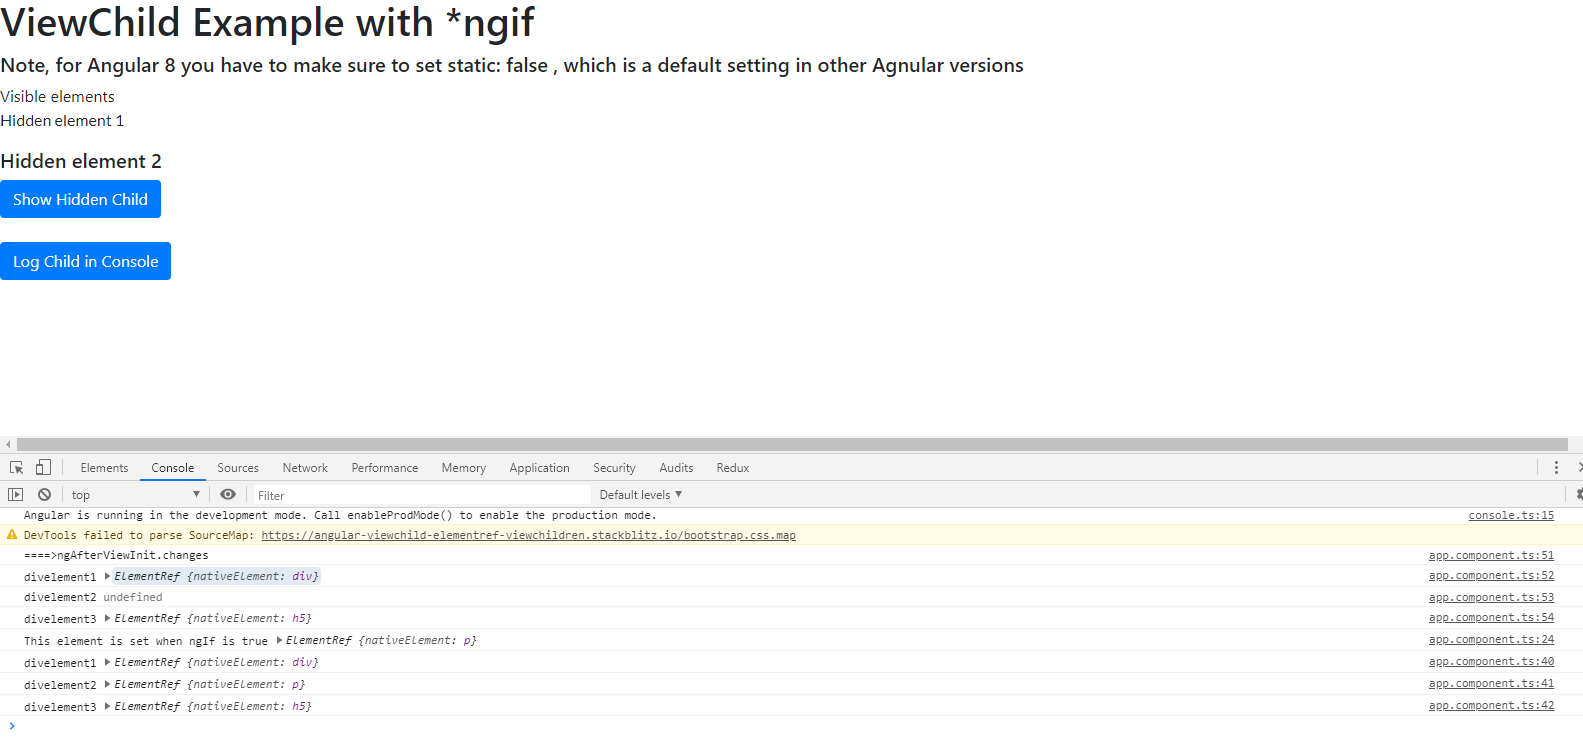
现在,一旦我们点击控制台中的Log Child,就会出现下面的样子。
HTML模板的代码。
1 2 3 4 5 6 7 8 9 10 11 12 13 14 15 16 17 18 19 20 21 22 23 24 25 26 27 28 29 30 31 32 33 34 35 36 37 <h1 > ViewChild Example with *ngif</h1 > <h5 > Note, for Angular 8 you have to make sure to set static: false , which is a default setting in other Agnularversions</h5 > <div #parent > <div #divelement1 > Visible elements </div > <ng-container *ngIf ="show" > <p #divelement2 > Hidden element 1 </p > </ng-container > <ng-container > <h5 #divelement3 > Hidden element 2 </h5 > </ng-container > </div > <div class ="row" > <div class ="col-md-2" > <button *ngIf ="true" id ="scrollHere" class ="btn btn-primary" (click )="showIt()" > Show Hidden Child </button > </div > </div > <div class ="row" > <div class ="col-md-12" > </div > </div > <div class ="row" > <div class ="col-md-2" > <button *ngIf ="true" id ="scrollHere" class =" btn btn-primary" (click )="logElements()" > Log Child in Console</button > </div > </div >
组件模板的代码。
1
2
3
4
5
6
7
8
9
10
11
12
13
14
15
16
17
18
19
20
21
22
23
24
25
26
27
28
29
30
31
32
33
34
35
36
37
38
39
40
41
42
43
44
45
46
47
48
49
50
51
52
53
54
55
56
57
58
59
60
61
62
63
64
65
66
import { Component , ViewChild , ElementRef , ViewChildren , QueryList , OnInit , AfterViewInit } from '@angular/core' ;@Component ({ selector : 'my-app' , templateUrl : './app.component.html' , styleUrls : [ './app.component.css' ] }) export class AppComponent implements OnInit { show = false ; @ViewChildren ('parent' ) children : QueryList <ElementRef >; @ViewChild ("divelement1" , { static : false }) divelement1 : ElementRef ; divelement2 : ElementRef ; @ViewChild ('divelement2' ) set ele2 (v: ElementRef ) { console .log ('This element is set when ngIf is true' , v); this .divelement2 = v; } @ViewChild ('divelement3' ) divelement3 : ElementRef ; ngOnInit ( console .log ('+++++ngOnInit++++++' ); console .log ('divelement1' , this .divelement1 ); console .log ('divelement2' , this .divelement2 ); console .log ('divelement3' , this .divelement3 ); } showIt ( this .show = true ; } logElements ( console .log ('divelement1' , this .divelement1 ); console .log ('divelement2' , this .divelement2 ); console .log ('divelement3' , this .divelement3 ); } ngAfterViewInit ( console .log ('--->ngAfterViewInit' ); console .log ('divelement1' , this .divelement1 ); console .log ('divelement2' , this .divelement2 ); console .log ('divelement3' , this .divelement3 ); this .children .changes .subscribe ((comps: QueryList<ElementRef> ) => { console .log ('====>ngAfterViewInit.changes' ); console .log ('divelement1' , this .divelement1 ); console .log ('divelement2' , this .divelement2 ); console .log ('divelement3' , this .divelement3 ); }); } }
概要 在这个文章中,我们已经学习了@ViewChild,以及当与ngIf指令一起使用时如何渲染它。我们还看到了如何使用ElementRef和@ViewChildren装饰符。通过示例,我们已经看到了如何初始化这些装饰符。